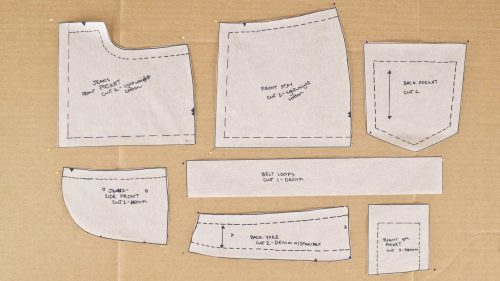
 Here's part 3 of our series, How to Create Patterns From Existing Clothing - Jeans. In this tutorial, it's all about the details of the jeans and creating our pattern pieces. Now that the major outlines are done, we can go about separating the individual outlines such as the front and back legs, yoke, pocket pieces, waistband, and belt loops. We also cover adding seam and hem allowance in order to transform your pieces from just simple outlines to usable patterns. Once you have your pattern pieces, I definitely recommend creating a muslin to test the fit of your pants. Chances are you're going to need to make some tweaks to your patterns to get them just right and it's better to discover this while using inexpensive fabric. Also, if you need help putting your jeans together, check out our tutorial Jeans Assembly.
In this tutorial, we are using outlines created in Part 1 and Part 2 of this series, so be sure to watch those first before attempting Part 3. As stated previously, your jeans may be different than mine, but, hopefully, our breakdown will provide some guidance.
You should have already watched Part 1
You should have already watched Part 2
This is currently Part 3
Next watch Jeans Assembly of this series


Yes, it is twisting a LOT!!!!. Thank you for your quick reply. I am going to try that and see what happens. Thanks, again.
Is your pant legs twisting? That would be a sign that it’s something to do with your grainline. It might be easier to put your grainline down the center of the leg sections of the pants. To make sure it’s centered, measure the width of the leg and mark the center, then just move up the leg and repeat the process so you can have a couple of points to draw a grainline. Hope this helps so you can wear your new jeans. 🙂
You are AWESOME. The video is incredible. I duplicated my first pair and the fitting is great EXCEPT that the legs are turned real bad. I think I got the grainline wrong. Please tell me how to determine the placement for the grain line Or is there something else I got wrong that make the legs look so weird? The back legs seem to look okay but I won’t really know till I get the front corrected.
I would say it is your internet connection. If it is slow, youtube will deliver a lower quality and those usually look less sharp – slightly blured because of the lower video encoding quality. You can always manually change it to a higher quality by clicking the gear icon in the lower right and selecting a higher quality. You might have to wait for it to buffer.
might just be me & my internet…..
I’m struggling to see this one. Is it just me, or is the camera focus really off?